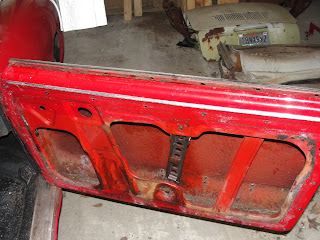
Here is the passenger door after I pulled the handles and aftermarket black door panel. Can tell the color difference between the original paint and the Maaco red re-paint. Also the lower bolt for the window lift channel is covered in RTV, so pried that off.
Better picture of the mechanisms in situ. And the overpaint and other muck. The window glass has stuck in the up position. That increased the fun when I later removed the glass.
The window winder and door lock mechanisms fully out of the door and on the concrete arranged as they are in the door. Like everything else I remove both of these items would be tagged with part numbers and description.
Everything is out of the door but lift channel that is holding the glass in. Gives a good shot of the hard demarcation line between colors. I think the rough texture on the inside of the outer door skin was an attempt by Karmann for sound insulation.
Peering at the front inside of the door. Got some surface rust to fix it looks like.
Now I am about to remove the door glass. I got a 10mm wrench. Checked it against late model coupe glass bolts to double check. Then proceeded to remove two 10mm bolts from the 58's glass. Glass not budging. So rattle glass just a tad, afraid of breaking glass with reason as I later discovered. Pulled the door felts out. Looked down the channel and realized why glass was still in place. I had forgotten to remove the upper two 10mm bolts holding the glass in. %)#)!!! So had to contort left hand with wrench to loosen bolts while right hand held the glass in place. At last both bolts were out and was able to lift the glass out intact.
How the door looked after removing the glass.
And here is the 58's door glass laying atop the passenger door glass from my 1970 parts coupe. Very different shaped glass. Would have had lots of fun tracking down the correct door glass if I had broke it or dropped it. Whew!
Now the outer chrome trim removal. I followed Loren's advice - got a piece of scrap 2x4 and a hammer. Then tapped the chrome towards the body. About 1/4 in should do it. Except in my case the outer mounting screws decided to hold on for dear life. Took a lot of shifting the trim back and forth before the chrome parted from the door. But it did come away in one piece and unbent.
With the chrome trim removed and a lot of the grime/corrosion scrubbed away with a wire brush. Now can see the mounting screws which are almost impossible to replace.
Here is one of the screws. Can see why they are a bit hard to replace. Instead of having a complete round Phillips screwdriver head, two of the sides are flat. This allows the chrome trim to slide over, fall down, and when slid back lock the trim in place.


No comments:
Post a Comment